Subscribe to my youtube channel for more videos here:
Read about Mobile push notification here: push-notification-for-native-application.html
[Monkey Talk]
[Mobile Application Automation Tool]

Mobile App quality is an important factor for good user experience read here we will see about monkey talk automation tool how we can achieve it, for non-functional tip read here here
About Monkey Talk?
Monkey Talk is open source Automation tool for Android and iOS. MonkeyTalk is a simple-to-use tool. It automates real, functional interactive tests for iOS, Android, Web/HTML5, Hybrid and Flex apps. This open source tool can be used for simple ‘smoke tests’ or for ‘data-driven test’ suites.

Why MonkeyTalk?
Native, mobile, and hybrid app, real devices or simulators. Moreover, automation saves time, it is reusable, repeatable and so on. Monkey talk is an open source automation tool. It supports both Android and iPhone. It is very easy to learn and it's a powerful functional testing tool.
Requirement to start testing with MonkeyTalk: Brief Overview
• Download and install Java
• Download MonkeyTalk Pro
• Need Eclipse or Android Studio to configure the source code
• In order to record the script with MonkeyTalk, we need to configure the build with some dependencies.
• The major component which is used for MonkeyTalk is MonkeyTalkAgent. Any build including Android or iOS need to be integrated with MonkeyTalk, otherwise, the tool will not able to recognize the elements of the app. As a result, we cannot record or run the script on our test app. The build which is integrated with MonkeyTalkAgent is called as Instrumented build.
Instrumentation can be done in 2 ways as follows:
• MonkeyTalkPro provides an inbuilt feature to instrument the build, which injects MonkeyTalkAgent to the built.
Otherwise, we can manually integrate the MonkeyTalkAgent by configuring the source code using eclipse or AndroidStudio before deploying the build.
• Before we start configuring the source code, we need to install “AspectJ” plugin in eclipse. Once the plugin is installed, open our project source code in eclipse.
Steps to instrument the Android build using eclipse as follows:
Configuring Monkeytalk with Eclispe
In order to start with Mobile App testing, there are some pre-requisites software/packages which we need to install/unzip on machine.
Pre-requisites:
• Eclipse setup
• Android SDK setup
• ADT Plug-in for Eclipse
• Monkey Talk Tool (Testing tool for Mobile Apps Testing)
• AJDT (for AspectJ conversion)
Eclipse:
Download Eclipse from URL:
http://www.eclipse.org/downloads/
Version: Eclipse Classic 3.7.2 (Windows 32 Bit)
No need to install the Eclipse, just unzip the downloaded folder anywhere in local drive. That will provide the ‘eclipse.exe’ which will open the Eclipse framework.
On opening the Eclipse framework, it will ask for the location of ‘workspace’ folder (‘Workspace’ is the location where the entire Eclipse project will be saved). Make any workspace folder anywhere in your machine and give the location.
Now Eclipse has successfully configured. Now we can open Eclipse, write any program and can save program to workspace folder.
Android SDK setup:
We need to setup and configure Android with Eclipse. Basically it is for development process but in case if we need to check how’s the application behave we can have a look on such the application in eclipse.
Download Android-sdk-windows (android-sdk_r18-windows) from the following URL:
http://developer.android.com/sdk/index.html
No need to install the Android, just unzip the downloaded folder (android-sdk_r18-windows) anywhere in local drive. That will provide the ‘SDK Manager.exe’ (which will open the Android SDK Manager) and ‘AVD Manager.exe’ (which will open the AVD Manager).
a ) SDK Manager: used for installing the Android packages
Run the ‘SDK Manager.exe’ (can be found in the ‘android-sdk-windows’ folder)
Android SDK manager will provide the list of package to install
Install any of the package (like Android 4.0.3 (API 15))
b) AVD Manager: used for creating the Virtual Device (emulator)
•Run the ‘AVD Manager.exe’ (can be found in the ‘android-sdk-windows’ folder)
•‘Android Virtual Device Manager’ window will be open.
•Click on New> and follow the steps as shown in below screenshot:
Name: name of Virtual device (or emulator
Target: version of Android emulator which you are going to use
CPU/ABI: for Android, use ARM
SD Card ‘Size’: it could be 512MB or 1GB
Snapshot: checked (best practice) [It will keep the track if any activity killed or process crashed, if its enabled we can restore the session ]
Skin ‘Built-in’: HVGA (for Android)
Click on ‘CreateAVD’. It will create the AVD which will be seen in ‘Android Virtual Device Manager’ under ‘AVD Name’ section.
Select the AVD name and click on ‘Start’. ‘Launch Option’ pop-up will be open. Then click on ‘Launch’. It will open the Android emulator.
ADT plug-in for Eclipse:
ADT plug-in extends the capabilities of Eclipse to let you quickly set up new Android projects, build an app UI, debug your app, and export signed (or unsigned) app packages (APKs) for distribution.
To install ADT plug-in:
• Start Eclipse> Help > Install New Software….
• Click Add, in the top-right corner.
• In the Add Repository dialog that appears, enter “ADT Plug-in” for the Name and the following URL for the Location:
• https://dl-ssl.google.com/android/eclipse/
• Click OK
Restart the Eclipse. It will ask for the Android SDK (which is we have already install as above mentioned steps) so Just give the location of Android SDK path.
Now while looking on the Eclipse, TWO newly added icons will be shown.
These TWO icons are for ‘AVD Manager’ and ‘Android SDK Manager’.
Now Eclipse is configured with Android SDK.
Monkey Talk:
Monkey Talk can be downloading from the below address:
http://www.gorillalogic.com/testing-tools/monkeytalk/download
Pre-requisit for installing Monkey Talk Agent:
For installing the Monkey Talk Android Agent, first we need to convert Android project into AspectJ.
For doing so, we need to configure AJDT in Eclipse by following steps:
Eclipse> Help> Install New Software > Click on Add…
In ‘Add Repository’ popup:
Name: AJDT
Location: http://download.eclipse.org/tools/ajdt/37/update
Click Ok. It will configure the AJDT with Eclipse.
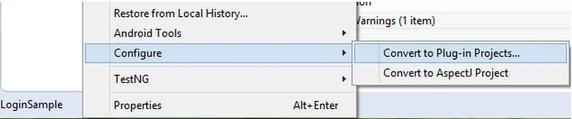
Steps to convert source code into Aspect J code
Step 1: Convert your Android project to AspectJ by right click the project name and select as follows.
Step 2: MonkeyTalk-agent.jar can be found in the “agents” folder in the MonkeyTalk package you downloaded earlier. The exact name of the jar might vary depending on the version, but it should always start with “MonkeyTalkagent”.
Step 3: Create a “libs” folder in your Android project, if you don’t already have one and Copy the monkeytalk-agent.jar into the libs folder.

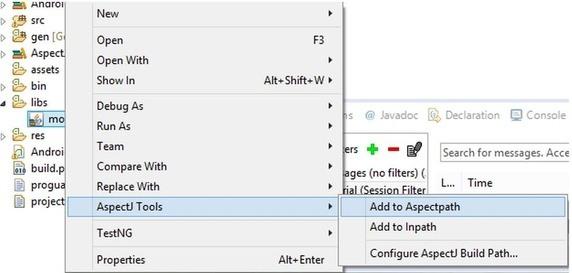
Step 4: Right click on MonkeyTalk-agent.jar→ AspectJ Tools→ Add to Aspectpath.
Step 5: Update your AndroidManifest.xml to include the following two permissions:

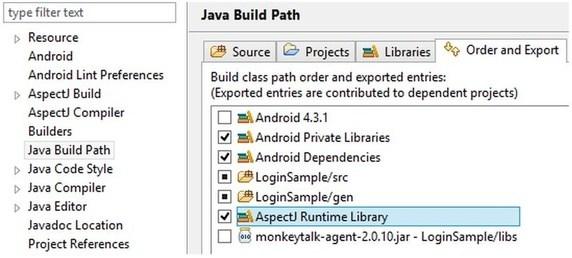
Step 6: Update the project properties (right-click on the project→ Properties→ Java Build Path), select the Order and Export tab, and check the checkbox next to the AspectJ Runtime Library to export it:
Step 7: Deploy your application to an Android device or emulator. As a result, you will find the instrumented apk in project’s bin folder. By using that apk, we now start the test with MonkeyTalkIDE. (For Video tutorial Click here).
Step to be followed to create a test in MonkeyTalkIDE as follows:
Step 1: Create new TestProject by selecting (File→ New→ Project→ General→ Project). Enter the Project name (eg. MyProject) and click finish.
Step 2: Now add Test to the project by right click on the project and select (New→ Script). Enter the name for the test (MyTest) and select the project to which it needs to be added. Now open the test file which we created (say “http://MyTest.mt”)

Step 3: Now we have to import the instrumented apk which we already created, by selecting menu (App→ Select a .apk file to test) or using toolbar as below:

Step 4: After adding apk, Choose any of the connected device or emulators to test.

Once the device is selected the console below will show the message like this:

Step 5: Now install that apk in the selected device as follows:

Step 6: Now launch the app in connected device as follows:

Note: Once again click on connect device, as a result the record and playback button will be enabled to start the test.
Step 7: Now we can start recording by click on record button.
Whatever we work on the test app will be recorded by monkeytalk and generate the test script as follows:
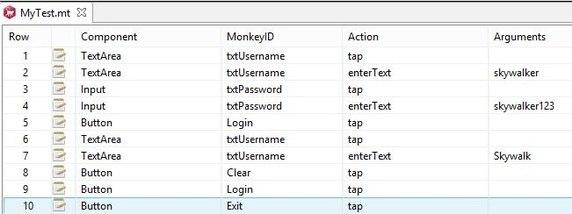
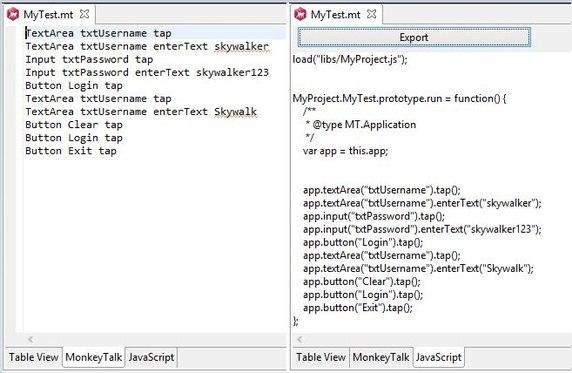
Our test script can be view and edit in 3 ways as follows:
Table view
Monkey talk Script
JavaScript

Step 8: Once the recording is done. Click on Stop button and click Play button to view the playback of the script. (Before clicking on Play button, relaunch the application is recommendable).
Step 9: To do a complete test on our test app, we have to add some verify commands if needed.
Step 10: Test result can be viewed in the console window.
Advantages of Monkeytalk:
Open source Tool
Provide Record and Playback
Support both Android and iOS
Support Cross platform recording
Easy Readable Test script
Support Gestures
Reference: Google and Quora


